It was a rainy Saturday afternoon when I first stumbled upon the idea of turning a simple pantry staple—canned tuna—into something that felt almost exotic. I was standing over a pot of simmering broth, the kitchen filled with the faint hiss of rain against the windows, when the scent of ginger and sesame oil drifted in from the next room. The moment I lifted the lid, a cloud of fragrant steam hit me, carrying whispers of distant Asian night markets and the promise of something both comforting and adventurous. That was the exact moment I realized I could create a dish that would bridge the gap between a quick weekday snack and a sophisticated appetizer you’d serve to guests with a smile.
Fast forward a few years, and the “Asian-Style Tuna Cakes with Spicy Mayo” have become a beloved fixture at our family gatherings, birthday parties, and even late‑night cravings after a long shift. The cakes are crisp on the outside, tender and flaky on the inside, and the spicy mayo adds that perfect zing that makes your taste buds do a little happy dance. Imagine biting into a golden patty that releases a burst of umami, followed by a creamy, tangy heat that lingers just long enough to keep you reaching for another. Have you ever wondered why restaurant versions taste so different? The secret lies not in expensive ingredients but in the thoughtful layering of flavors and textures—something I’ll unpack in a moment.
But wait—there’s a twist that will take these cakes from good to unforgettable, and it’s hidden in step four of the cooking process. I won’t give it away just yet, because I love watching the lightbulb go off when you discover it for yourself. Trust me, you’ll thank me later when you see how that one extra dash of lime juice can transform the entire profile. And if you’re thinking, “I don’t have a lot of time,” the beauty of this recipe is that it’s both quick and forgiving, making it perfect for busy weeknights or leisurely weekend brunches.
Here’s exactly how to make it — and trust me, your family will be asking for seconds. Grab your pantry staples, fire up the skillet, and let’s dive into a culinary adventure that feels like a mini‑vacation every time you take a bite. Ready? Let’s get cooking and uncover the magic together.
🌟 Why This Recipe Works
- Flavor Depth: The combination of soy sauce, ginger, and garlic creates a layered umami foundation that mimics the complex sauces you’d find in a bustling Asian street stall. Each bite delivers a savory punch that’s balanced by the bright acidity of lime in the mayo.
- Texture Contrast: Panko breadcrumbs give the cakes a light, airy crunch, while the tuna remains tender and flaky, offering a delightful contrast that keeps you chewing happily.
- Ease of Preparation: With only a handful of pantry items and a quick skillet, the entire process fits neatly into a 45‑minute window, making it ideal for both novice cooks and seasoned chefs.
- Time Efficiency: The recipe uses canned tuna, which eliminates the need for fresh fish handling, and the mayo sauce can be whisked together while the cakes fry, streamlining the workflow.
- Versatility: These cakes can be served as an appetizer, a main course paired with a salad, or even as a protein‑packed sandwich filler, adapting to any meal plan you have in mind.
- Nutrition Boost: Tuna provides lean protein and omega‑3 fatty acids, while the modest amount of mayo keeps the dish indulgent without overwhelming the health factor.
- Ingredient Quality: Each component—soy sauce, sesame oil, fresh ginger—brings its own aromatic profile, ensuring that the final dish feels premium even though it’s made from pantry basics.
- Crowd‑Pleasing Factor: The spicy mayo adds a gentle heat that appeals to a wide range of palates, making it a safe yet exciting choice for gatherings.
🥗 Ingredients Breakdown
The Foundation: Tuna & Binder
The star of our dish, flaked white tuna, brings a delicate, melt‑in‑your‑mouth texture that serves as the perfect canvas for all the bold flavors to come. I always opt for a high‑quality brand that packs the fish in water rather than oil, because it keeps the cakes light and prevents them from becoming greasy. If you’re feeling adventurous, you can swap the white tuna for albacore or even a mix of tuna and canned salmon for a richer mouthfeel. The egg acts as a gentle binder, holding the mixture together without adding heaviness, while the breadcrumbs—whether regular or panko—create that coveted crisp exterior that makes the first bite so satisfying.
Aromatics & Spices: The Flavor Engine
The green onions provide a subtle sharpness; I keep the whites separate from the greens because the whites need a longer cooking time to mellow, while the greens add a fresh burst at the end. Freshly grated ginger and minced garlic are the dynamic duo that infuse the mixture with a warm, aromatic base reminiscent of a classic Asian stir‑fry. A splash of soy sauce introduces salty depth, and the sesame oil contributes a toasted, nutty note that lingers on the palate. If you’re out of soy sauce, a dash of tamari or even a spoonful of fish sauce can work as a substitute, though you’ll want to adjust the salt accordingly.
The Secret Weapons: Heat & Brightness
The spicy mayo is where the magic truly happens. By whisking together mayonnaise, sriracha, and the juice of half a lime, you create a creamy, tangy sauce that cuts through the richness of the cakes and adds a playful heat. The lime’s acidity also balances the soy sauce, preventing the dish from feeling too salty. If you prefer a milder version, reduce the sriracha or replace it with a dash of smoked paprika for a subtle smoky undertone. Remember, the quality of your mayo matters—go for a full‑fat version for the best texture.
Finishing Touches: Salt, Pepper & Oil
A pinch of salt and freshly cracked black pepper is essential to bring all the flavors together; taste as you go to avoid over‑seasoning. For frying, I recommend a neutral vegetable oil with a high smoke point, such as canola or grapeseed, so the cakes achieve a golden crust without burning. If you’re aiming for a lighter version, you can finish the cakes in the oven at 400°F for 12‑15 minutes, but the skillet method gives that satisfying sizzle and caramelization you can’t replicate in the oven.
With your ingredients prepped and ready, let's get cooking. Here's where the fun really begins...
🍳 Step-by-Step Instructions
Start by draining the two 142‑gram cans of flaked white tuna, pressing gently with a fork to remove excess liquid. The goal is to have the tuna as dry as possible so it doesn’t make the mixture soggy. Transfer the tuna to a large mixing bowl and set it aside while you prepare the aromatics. The moment you see those little flecks of tuna, you’ll already be picturing the crispy cakes that are about to form.
In a small skillet over medium heat, add the sesame oil and let it warm until it shimmers, then toss in the grated ginger and minced garlic. Listen for the gentle sizzle—this is the sound of flavor building, and it will fill your kitchen with an irresistible aroma that signals you’re on the right track. Cook for about 30 seconds, just until the garlic turns golden and the ginger becomes fragrant, being careful not to let it burn. Once done, remove from heat and let the mixture cool slightly.
Now, combine the cooled ginger‑garlic oil with the tuna in the large bowl. Add the soy sauce, sesame oil, the whites of the green onions, and a pinch of salt and pepper. Stir gently with a wooden spoon until everything is evenly incorporated—this is where the secret twist I mentioned earlier comes into play: sprinkle in the lime juice at this stage. The lime not only adds brightness but also helps the breadcrumbs absorb the moisture more evenly, resulting in a lighter cake.
Add the beaten egg and the breadcrumbs to the bowl, then fold in the green onion greens. The mixture should hold together when pressed; if it feels too wet, sprinkle in an extra tablespoon of breadcrumbs. Conversely, if it’s too dry, a splash of water or an extra drizzle of sesame oil will bring it back to life. Once you achieve a cohesive but not sticky consistency, shape the mixture into eight equal patties, each about ½‑inch thick. The act of shaping is oddly therapeutic—press gently, then roll the patty between your palms to smooth the edges.
Heat a generous drizzle of vegetable oil in a non‑stick skillet over medium‑high heat. You’ll know the oil is ready when a drop of water sizzles and evaporates instantly. Carefully place the patties in the pan, leaving a little space between each so they can crisp up evenly. Cook for 3‑4 minutes on the first side, watching for a deep golden hue and a faint nutty fragrance that tells you they’re ready to flip.
Flip the cakes and cook for another 3‑4 minutes, or until both sides are beautifully browned and the interior is heated through. The sound of the edges bubbling is a good indicator that the crust has formed. Once done, transfer the cakes to a paper‑towel‑lined plate to absorb any excess oil. While the cakes rest, they’ll continue to firm up, making them easier to handle when you plate them.
While the cakes are resting, whisk together the mayonnaise, sriracha, and lime juice in a small bowl until smooth and glossy. Taste and adjust the heat level—add more sriracha if you love a fiery kick, or a pinch of sugar if you prefer a balanced sweet‑heat. This sauce is the final flourish that ties the entire dish together, providing a cool, creamy contrast to the hot, crunchy cakes.
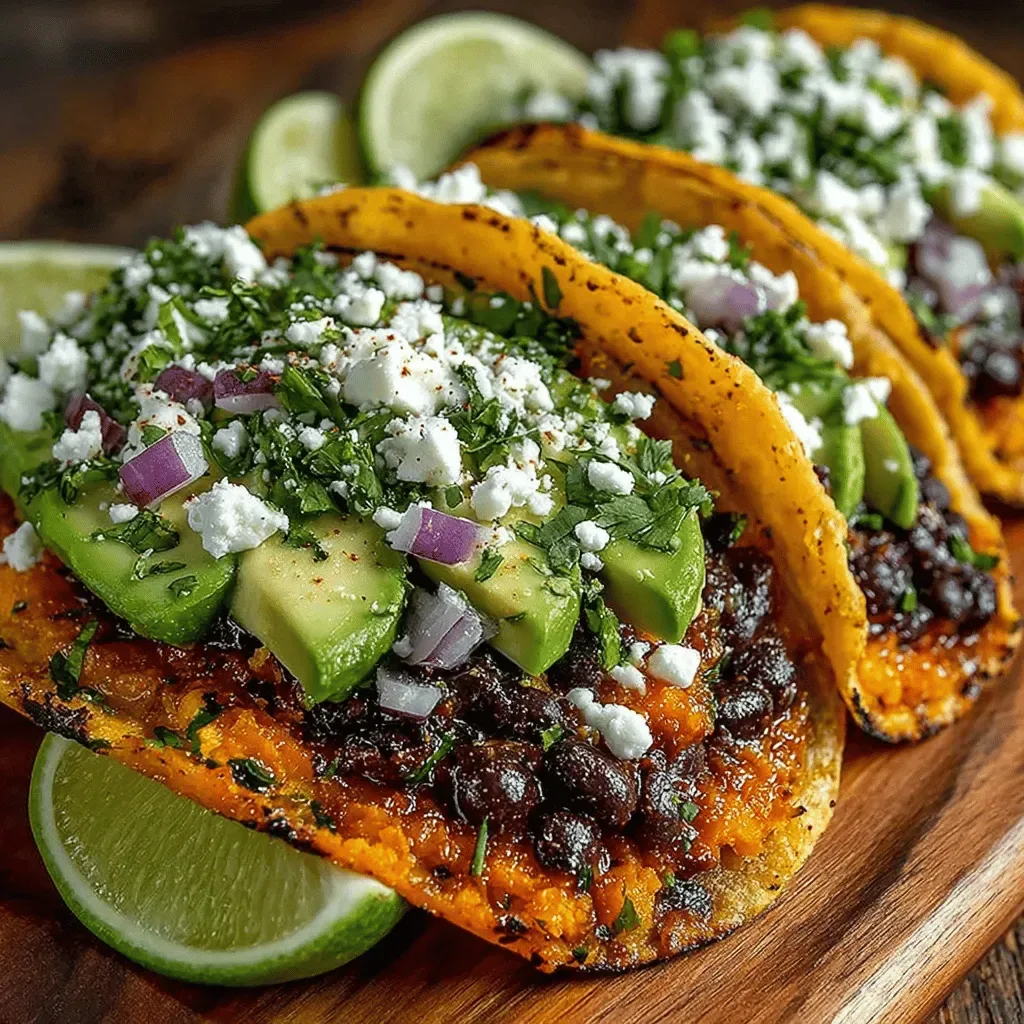
To serve, arrange the tuna cakes on a platter, drizzle or dollop the spicy mayo over each, and garnish with the remaining green onion greens for a pop of color. The bright green specks not only look inviting but also add a fresh bite that cuts through the richness. Pair them with a light cucumber salad or a simple soy‑ginger dipping sauce if you want extra layers of flavor. And there you have it—your very own Asian‑style tuna cakes, ready to impress family and friends alike.
And there you have it! But before you dig in, let me share some tips that will take this from great to absolutely unforgettable. These insider tricks have saved me from soggy cakes and bland mayo, and they’ll help you achieve restaurant‑quality results every single time.
🔐 Expert Tips for Perfect Results
The Taste Test Trick
Before you form the patties, scoop a tiny spoonful of the raw mixture onto a plate and give it a quick taste. This moment of honesty lets you adjust the seasoning—maybe a pinch more soy sauce or a dash more pepper—so that the final cakes are perfectly balanced. I once skipped this step and ended up with a bland batch, learning the hard way that a quick taste can save an entire dinner. Trust me on this one: a few seconds of tasting now prevents a whole plate of disappointment later.
Why Resting Time Matters More Than You Think
After mixing, let the tuna mixture rest for 10 minutes before shaping. This short pause allows the breadcrumbs to fully hydrate, creating a cohesive texture that holds together during frying. I’ve seen cooks rush straight to the pan and end up with cakes that crumble apart, a frustrating experience that could have been avoided with a simple rest. The result? A firmer, more uniform patty that doesn’t fall apart when you flip it.
The Seasoning Secret Pros Won’t Tell You
A dash of toasted sesame seeds mixed into the breadcrumb coating adds a subtle crunch and a nutty aroma that elevates the overall dish. It’s a tiny addition that most home cooks overlook, but once you try it, you’ll wonder why you ever cooked without it. I discovered this secret during a cooking class where the chef sprinkled the seeds just before the final fry, and the aroma was intoxicating. Incorporate it next time and watch your guests’ eyes widen with delight.
Heat Management: The Golden Rule
Maintain a medium‑high heat, but avoid letting the oil smoke. If the oil gets too hot, the breadcrumbs will burn before the interior heats through, resulting in a bitter aftertaste. A good trick is to test the heat by dropping a single breadcrumb into the oil; if it sizzles and turns golden in about 30 seconds, you’re at the perfect temperature. Adjust the flame as needed—lower it if the cakes are browning too quickly, and increase slightly if they’re taking too long.
The Mayo Makeover
For an extra layer of complexity, blend a teaspoon of fish sauce into the spicy mayo. The fish sauce adds depth without making the sauce overtly fishy, complementing the tuna’s natural flavor. I first tried this after reading about Japanese “ponzu mayo” and was amazed at how it lifted the entire dish. Remember, a little goes a long way, so start with a small amount and taste as you go.
Serving Style: Plate Like a Pro
Instead of just stacking the cakes, arrange them in a fan shape on a large platter, drizzle the spicy mayo in a zig‑zag pattern, and sprinkle fresh cilantro or microgreens on top. This presentation not only looks stunning but also ensures each bite gets a perfect amount of sauce. I’ve found that a beautifully plated dish makes the eating experience feel more special, even if it’s just a simple weeknight snack. The visual appeal can turn a humble tuna cake into a conversation‑starter.
🌈 Delicious Variations to Try
One of my favorite things about this recipe is how versatile it is. Here are some twists I've tried and loved:
Crispy Coconut Crust
Replace half of the breadcrumbs with finely shredded unsweetened coconut. The coconut adds a subtle sweetness and a tropical crunch that pairs surprisingly well with the spicy mayo. This variation works great for summer gatherings when you want a hint of island flair.
Thai Basil Infusion
Stir in a handful of chopped Thai basil leaves into the tuna mixture before shaping. The herb brings an aromatic, slightly peppery note that transports you straight to a Bangkok street market. Pair with a peanut dipping sauce for a full Thai experience.
Wasabi Kick
Add a teaspoon of freshly grated wasabi to the spicy mayo for a bold, sinus‑clearing heat. This version is perfect for adventurous eaters who love a punch of heat that lingers. Be cautious—wasabi can quickly become overpowering, so start with a small amount and adjust to taste.
Mediterranean Fusion
Swap the soy sauce for a splash of lemon‑herb vinaigrette and add chopped kalamata olives and sun‑dried tomatoes to the mixture. The result is a Mediterranean‑Asian hybrid that’s bright, tangy, and briny all at once. Serve with a side of tzatziki for an unexpected but delightful pairing.
Veggie‑Boosted Patties
Finely grate a carrot and a zucchini, squeeze out excess moisture, and fold them into the tuna mixture. The added vegetables increase the cake’s volume, add natural sweetness, and make the dish feel a bit lighter. This is a great way to sneak extra nutrients into a kid‑friendly meal.
📦 Storage & Reheating Tips
Refrigerator Storage
Place cooled tuna cakes in an airtight container lined with a paper towel to absorb any residual oil. They’ll stay fresh for up to three days, retaining most of their crispness. If you notice the crust softening, a quick re‑heat in a hot skillet for a minute on each side will revive the crunch. The trick to reheating without drying it out? A splash of water in the pan and a quick cover for 30 seconds creates steam that keeps the interior moist.
Freezing Instructions
Arrange the cooked cakes on a parchment‑lined tray and freeze until solid, then transfer them to a zip‑top freezer bag. This method prevents them from sticking together, allowing you to pull out just the number you need. Frozen cakes can be stored for up to two months. When you’re ready to enjoy them, bake at 375°F for 12‑15 minutes or pan‑fry directly from frozen, adding an extra minute per side.
Reheating Methods
For the best texture, reheat in a preheated oven at 400°F for 8‑10 minutes, turning once halfway through. This restores the golden crust without making the interior rubbery. If you’re short on time, a quick microwave will melt the mayo but won’t revive the crunch—so reserve the microwave for the sauce only. Remember, gentle reheating preserves the delicate balance of flavors you worked so hard to achieve.