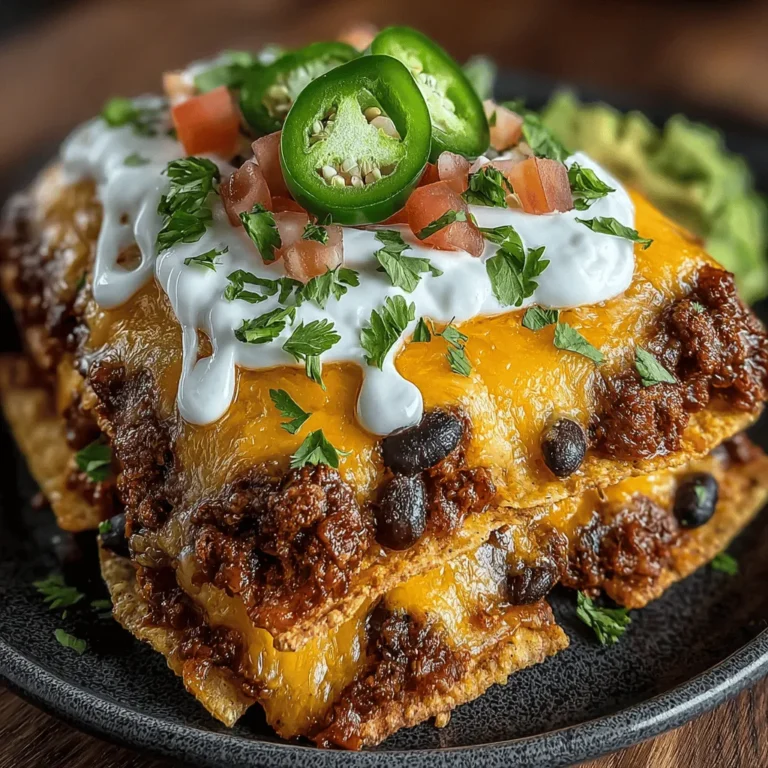
Spicy Chicken Chili Nacho Casserole: The Ultimate Comfort Food
When it comes to hearty comfort food, few dishes can compete with Spicy Chicken Chili Nacho Casserole. This dish is a delightful fusion of flavors that brings together spicy, cheesy, and hearty elements, making it the ideal choice for various occasions. Whether you’re hosting a family dinner, gathering with friends for a game day, or simply craving a cozy meal, this casserole checks all the boxes. Its rich flavors and satisfying textures make it a standout dish that is sure to please a crowd.
What sets Spicy Chicken Chili Nacho Casserole apart is not just its flavor profile, but also its ease of preparation. Designed with a slow cooker in mind, this recipe allows you to bring together a medley of ingredients with minimal effort, letting you spend more time enjoying your company and less time in the kitchen. The slow cooker method enhances the dish’s flavors, resulting in a comforting meal that warms the heart and fills the belly.
Understanding the Ingredients
Before diving into the cooking process, let’s take a closer look at the main components of this delicious casserole: chicken, beans, and spices. These ingredients not only contribute to the flavor but also pack a nutritional punch.
1. Chicken: The primary protein source in this dish, chicken provides essential amino acids, making it an excellent choice for a balanced meal. For this casserole, shredded rotisserie chicken or cooked chicken breasts are ideal, as they create a tender texture that melds beautifully with the other ingredients.
2. Beans: Black beans or pinto beans are commonly used in this recipe. They are an excellent source of dietary fiber, which aids in digestion and helps keep you feeling full. Additionally, beans are rich in vitamins and minerals, making them a nutritious complement to the dish.
3. Spices and Vegetables: The flavor of the casserole comes alive through the use of spices such as chili seasoning, cumin, and garlic powder, along with fresh ingredients like tomatoes and onions. These spices not only enhance the overall taste but also offer various health benefits, including anti-inflammatory properties.
While canned ingredients can be convenient, using fresh produce elevates the dish’s flavor profile significantly. Fresh tomatoes, for example, provide a burst of juiciness and sweetness that canned varieties can lack. Opting for fresh onions enhances the dish’s aroma and taste, creating a more vibrant overall experience.
Preparation of the Chicken Chili
Now that we understand the importance of the ingredients, let’s move on to the preparation of the chicken chili in the slow cooker. This step is crucial as it lays the foundation for the casserole.
1. Start with the Chicken: If you’re using raw chicken, begin by seasoning it with spices such as salt, pepper, and a blend of chili seasoning. This initial step ensures that the chicken is infused with flavor from the very beginning. Place the seasoned chicken in the slow cooker along with diced onions, minced garlic, and chopped tomatoes.
2. Building the Flavor: Next, add your choice of beans to the slow cooker. This is where the magic happens—the combination of spices, chicken, and beans creates a harmonious blend of flavors. Don’t forget to sprinkle in some cumin and additional chili seasoning to intensify the taste profile. These spices are essential for achieving that authentic chili flavor that everyone loves.
3. Cooking Methods: One of the great advantages of using a slow cooker is the flexibility it offers. You can cook your chicken chili on low for 6-8 hours or on high for 3-4 hours, depending on your time constraints. Cooking low and slow allows the flavors to meld beautifully, resulting in tender, shredded chicken that easily falls apart. If you’re short on time, cooking on high is a great alternative; just be sure to check the chicken periodically to prevent overcooking.
4. Perfecting the Shredded Chicken: Once the cooking time is complete, it’s time to shred the chicken. Using two forks, gently pull apart the chicken, ensuring that it mixes well with the other ingredients. The goal is to create a cohesive mixture where every bite delivers a satisfying blend of chicken, beans, and spices.
By following these steps, you will have a flavorful chicken chili that serves as the base for your casserole. The combination of spices and the slow-cooked chicken will create a rich and savory mixture that is perfect for layering in your casserole dish.
Assembling the Casserole
With the chicken chili prepared, it’s time to assemble your Spicy Chicken Chili Nacho Casserole. The layering technique is vital for ensuring even flavor distribution and optimal texture throughout the dish.
1. Choosing the Base: Start with a layer of tortilla chips at the bottom of your casserole dish. The type of chips you choose can greatly impact the overall texture of the dish—look for sturdy, thick chips that can hold up to the weight of the toppings without becoming soggy. Tortilla chips provide the necessary crunch that complements the creamy and hearty aspects of the casserole.
2. Layering the Ingredients: Next, spoon a generous amount of the prepared chicken chili over the chips, ensuring that it is evenly distributed. Follow this with a layer of sour cream and shredded cheese. The sour cream adds a lovely creaminess that balances the spiciness of the chili, while the cheese melts beautifully, creating a gooey, indulgent topping.
3. Balancing the Flavors: To elevate your casserole even further, consider adding optional ingredients such as sliced jalapeños for an extra kick or diced avocado for a creamy texture. These additions not only enhance the flavor but also add visual appeal to your dish.
4. Final Touches: Repeat the layering process until you reach the top of your casserole dish, finishing with a generous sprinkle of cheese. This top layer will create a deliciously bubbly and golden crust when baked.
As you prepare to bake your Spicy Chicken Chili Nacho Casserole, remember that this dish is all about balancing flavors and textures. The combination of the crunchy tortilla chips, the flavorful chicken chili, and the melty cheese creates a symphony of taste that is sure to delight everyone at your table.
Stay tuned for the next part of the article, where we’ll discuss the baking process, serving suggestions, and tips for customizing your casserole to suit your taste preferences!

Baking the Casserole
Baking your Spicy Chicken Chili Nacho Casserole requires precision to achieve that perfect balance of flavors and textures. Start by preheating your oven to 375°F (190°C). This ensures that your casserole cooks evenly and helps to create that desirable golden-brown top layer.
Once your oven reaches the right temperature, cover your casserole dish with aluminum foil and place it in the oven. The foil will help keep moisture in, allowing the ingredients to meld beautifully together. Bake for 25-30 minutes with the foil on.
Signs of a Perfectly Baked Casserole
After the initial baking time, it’s time for a check. Remove the foil and look for these signs that indicate your casserole is ready to come out of the oven:
– Bubbling Cheese: The cheese should be bubbling and slightly golden on top. This is a clear indication that it’s melted and has begun to brown, adding a delightful texture.
– Golden Edges: The edges of the casserole should be a light golden color. This caramelization enhances the flavor and adds to the visual appeal of the dish.
– Firmness: Gently shake the casserole dish; the center should be set but still have a slight jiggle as it is fully cooked. If it still appears soupy, return it to the oven for an additional 5-10 minutes.
Once baked, allow your casserole to rest for about 10-15 minutes before serving. This resting period is crucial as it allows the layers to set, making slicing and serving much easier. Cutting into a hot casserole straight from the oven can lead to a messy presentation, so patience pays off!
Garnishing and Serving Suggestions
Presentation is key when serving your Spicy Chicken Chili Nacho Casserole. Enhancing the dish with garnishes not only adds visual appeal but also layers of flavor. Here are some creative ideas for garnishing:
– Fresh Cilantro: Chopped cilantro adds a burst of freshness that brightens the rich flavors of the casserole.
– Sliced Jalapeños: For those who enjoy a little extra heat, fresh jalapeño slices provide both spice and crunch.
– Diced Avocado: Creamy avocado balances the spiciness and adds a luxurious texture to each bite.
Pairing Suggestions
To round out your meal, consider complementing the casserole with simple sides that enhance the overall dining experience:
– Fresh Salads: A light salad dressed with lime vinaigrette can provide a refreshing contrast to the rich and hearty casserole.
– Dips: Serve with a side of guacamole or salsa for a delightful contrast in flavors and textures.
When it comes to serving, consider the occasion. For family-style dining, serve the casserole directly from the baking dish, allowing guests to help themselves. If you prefer individual servings, use a sharp knife to slice into portioned squares for a more refined presentation.
Exploring Variations and Customizations
One of the beauties of the Spicy Chicken Chili Nacho Casserole is its versatility. You can easily tailor the recipe to suit your taste preferences or dietary needs.
Ingredient Swaps
If you’re looking to switch things up, here are some options:
– Different Proteins: Substitute chicken with ground turkey or beef for a heartier version. For a vegetarian option, consider using black beans or lentils as a protein source.
– Spice Level Adjustments: If you prefer a milder flavor, reduce the amount of chili powder and omit spicy jalapeños. Alternatively, for a spicier kick, incorporate diced serrano peppers or add a splash of hot sauce.
Dietary Considerations
For those with specific dietary needs, this casserole can be easily adapted:
– Gluten-Free: Ensure all ingredients, including sauces, are gluten-free. Use gluten-free tortilla chips or omit them altogether for a low-carb option.
– Dairy-Free: Substitute regular cheese with a dairy-free cheese alternative or simply use nutritional yeast for a cheesy flavor without dairy.
These variations allow you to make the casserole uniquely yours while still maintaining its core appeal.
Storing and Reheating Leftovers
If you find yourself with leftovers (which is often the case since this dish is so filling), proper storage is essential to maintaining flavor and freshness.
Best Practices for Storing Leftovers
– Cool Down: Allow the casserole to cool completely at room temperature before transferring it to the refrigerator. This prevents moisture buildup, which can lead to sogginess.
– Storage Containers: Store leftovers in an airtight container. If you plan to keep them for more than a few days, consider wrapping the casserole tightly in plastic wrap before placing it in a container.
Leftovers can typically last in the fridge for up to 3-4 days. For longer storage, consider freezing the casserole. Wrap it tightly in foil or plastic wrap and place it in a freezer-safe container. It can be stored in the freezer for up to 2 months.
Reheating Tips
When you’re ready to enjoy your leftovers, reheating properly is key to retaining flavor and texture:
– Oven Reheating: Preheat your oven to 350°F (175°C). Place the casserole in an oven-safe dish, cover with foil, and heat for about 20-25 minutes until warmed through. This method preserves the texture and prevents the casserole from drying out.
– Microwave Reheating: If you’re in a hurry, you can also reheat individual portions in the microwave. Place a portion on a microwave-safe plate, cover with a damp paper towel, and heat for 1-2 minutes, checking frequently to avoid overheating.
Repurposing Leftovers
Leftovers don’t have to be boring! Get creative by repurposing them into new meals:
– Nacho Bowls: Layer the casserole with tortilla chips, avocado, and your favorite toppings for a quick nacho bowl.
– Burritos: Use the casserole as a filling for burritos, topped with salsa and guacamole for a delicious twist.
Conclusion
The Spicy Chicken Chili Nacho Casserole is not just a dish; it’s a versatile, crowd-pleasing meal that brings everyone together. With its ease of preparation, bold flavors, and hearty ingredients, it’s perfect for family dinners, game day gatherings, or even a cozy night in with friends.
This recipe allows for endless possibilities, whether you stick to the classic version or explore the many variations and customizations. Its ability to adapt to different dietary needs and spice preferences makes it a go-to recipe in any kitchen.
So why not give this delightful casserole a try? Gather your ingredients, unleash your creativity, and enjoy the scrumptious flavors that will have everyone coming back for seconds. Happy cooking!


